Friday, May 31, 2013

Homemade Chalk Paint & a Beautiful Desk!

I have had lots of questions about homemade chalk paint and I have to admit I have not personally tried it YET, it is on my TO DO list. 

 However my awesome neighbor and good friend put 2 recipes to the test.  

Calcium Carbonate 
Combine
2 Tablespoons Calcium Carbonate Powder
1 Tablespoon Water
Mix until Calcium is dissolved
Pour Carbonate mixture into 1 cup of Latex Paint

To make a Quart use 8 Tablespoons of Calcium Carbonate Powder and 4 Tablespoons of water to one quart of Latex Paint

Plaster of Paris
3 parts paint
1 part plaster of paris
water

Combine water with Plaster of Paris, adding a little bit at a time until you get a nice smooth consistency. Add more water to break down the powder.  Once the powder has dissolved in the water add to your paint and MIX


My biggest concern with creating your own chalk paint is getting the consistency right.  After my neighbor mixed up the paints she brought them over and we compared the consistency with some Annie Sloan's Chalk Paint I had on hand, both recipes were still a bit lumpy so she took them home and MIXED and MIXED until the paint was smooth-Annie Sloan Chalk Paint is about the consistency of Waffle/pancake batter!

Then my neighbor put both of the paints to test on a smaller project.  After she painted, antiqued and waxed, both paints preformed great and she didn't find a difference in quality!  
She ended up going with Plaster of Paris because it was cheaper to make.

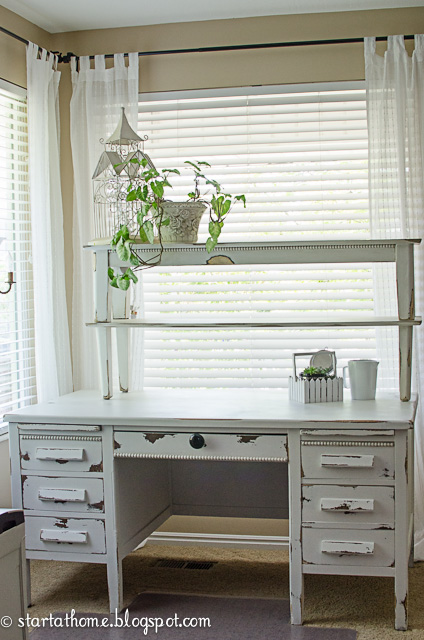
And here is the finished Project, BEAUTIFUL!!


The 2 shelves on the desk are tables she painted and stacked.  Great for added storage!


She also ordered this awesome molding and ran it along a few areas to dress up the desk and the center knob is an old door knob.  

As I mentioned earlier making my own chalk paint has always been on my TO DO list, I do believe it just got moved up to HIGH PRIORITY!  I  have the perfect piece in mind.


Happy Weekend

Brooke

Thursday, May 30, 2013

Grace Adele Giveaway!!

I am so excited about this Grace Adele giveaway, I even dreamed about it last night!  

For 3 reasons:

  1. I LOVE Evelyn Cook, she is so much fun, great to work with and a huge help.  I am so happy to call her my friend!  
  2. I LOVE this bag and Clutch!  I really really want one.  I was half tempted to just keep it for myself.  I even threatened!
  3. This retails at $120, and it could be yours for FREE (see why I wanted to steal it?)


How to enter:
Follow Start at Home's Blog ( if you already follow my blog skip this step)
Like Start at Home on Facebook (if you already like my page skip this step) and share the giveaway post on your personal Facebook Page 
                   You can share everyday for an additional entry BONUS!!
and for extra entries:
Tag your friends on Facebook
Follow Start at Home on Instagram
Follow Start at Home on Twitter
Please leave me a comment so I know what you have done, and yes I will check.  
I am old fashion so for every entry I will add your name to the hat!!
This Giveaway will close June 7th @ 11:59 pm and the winner will be announced on June 8th!!


Let me tell you a little more about this bag: (or click this link for more pictures)


Your perfect everyday bag in durable faux leather. 
This slouchy hobo hides an extra zippered pocket in a sunken vertical seam.
•  Faux leather
•  16” L, 9.5” H, 7.5” W
•  Handle with 10.5" drop 
•  Exterior pocket fits any Grace Adele Clutch
It retails at $80

Here is more info on the clutch: (or click this link for more pictures)

Fun and fabulous, Shay features eye-catching contrast stripes and a subtle tab closure. 
This striking clutch fits inside the exterior pocket on your favorite Grace Adele Bag.
•  Faux leather
•  9" L, 6" H 
•  Detachable shoulder strap with 23.5" drop
It retails at $40
Don't forget to head over to Evelyn's Grace Adele Website where you can CUSTOMIZE your perfect look, they also have fun accessories and Jewelry!  She has awesome online parties, and like I said before she is wonderful to work with.  If you are local book your own party today and EARN FREE STUFF!

Wednesday, May 29, 2013

Wainscoting in the Family Room and a Tutorial

In our family room we have a very odd shaped large wall where our entertainment center sits.  The drop down ceiling makes everything out of balance and drives me crazy!  I really wanted built in's and a fireplace and on and on and on.  Unfortunately for me with today's budget that isn't an option, so we had to come up with another idea to make this wall pop on a very tight budget! 

Here is the Before, a terrible pic I know but before's are supposed to be terrible right?


After:


Budget solution: we used left over molding from the basement!  I love it so much maybe built in's are a thing of the past, maybe! 

Want to make your own wall?  Here is how!


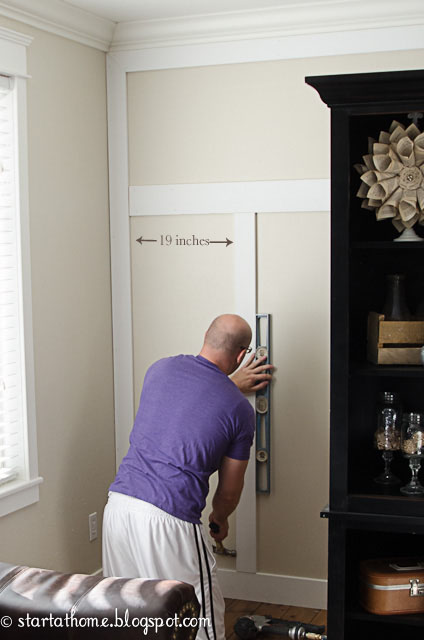
1-frame out the wall with moldings, the frame around the entire wall is made with chair rail.


2-run a piece of molding 19 inches from the top.  
For this piece of molding we used base as I wanted it thicker than everything else.   


3-run your chair rail from your top base to your bottom base, and repeat on the top.
Hint: Use a level so your moldings go up straight!


4-Nail up your moldings
5-fill your nail holes with putty
6-caulk all your moldings to fill in all the cracks (tutorial to come)


 6-Paint!  

I wanted everything to be the same color.
 I painted the entire wall with Benjamin Moore's White Dove in Satin, it created a nice subtle contrast to my other cream walls!


and TADA you have a beautiful new accent wall!

TTFN

 photo 3b4f7ad1-7e95-4c99-81c2-6cdc9b99ee91_zps531be133.jpg

Tuesday, May 28, 2013

Entryway, What's Your Story?


I have been asked to teach a class tonight on Entry Ways.  It took me a little by surprise but I am always up for a challenge!    

"An entryway is an introduction.
Like the opening pages of a book, it leads us in and welcomes us to the world inside."
~Rose Tarlow~

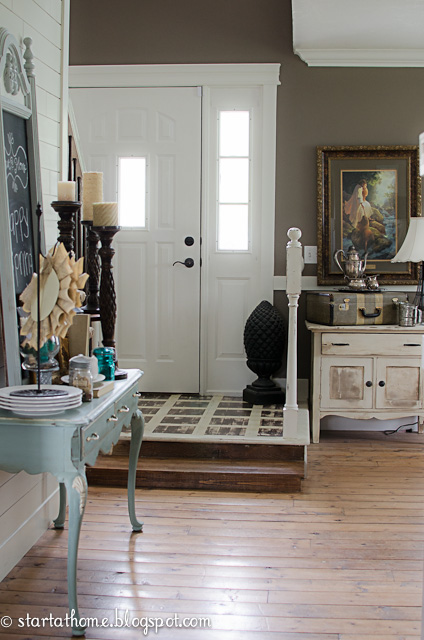
When I was deciding on how I wanted my entry way to be decorated there were a few elements I wanted in cooperated.  As the above quote states your entry way is the first glimpse and sometimes the only glimpse a person gets into your home and I wanted it tell our story.   

First up my family.  I am one of those crazy ladies that always looks like a tourist because I  have a huge camera around my neck.  I have so many pictures I needed lots of area to display them.  My wall tells so much about our family from the pictures to the sayings.  It is the first thing you see when you enter our home!  There is even a missing picture, I am sure one of my girls took off with, even adds more to the story of our home.


Next is this picture of Christ.  My family gave it to Devin and I as our wedding gift.  I have always loved this picture and love the message it offers without words.
 
Christ is the center of our home, so it was important to me to have it in an area where all could see as a constant reminder.    


Last up in this table full of all the fun things I run all over the place to collect and repurpose!  Everything on this table has some meaning to me and most of the items have a fun story of how or where I found it.


There is a glimpse of "our world inside" told at our front door!

TTFN

Brooke


Friday, May 24, 2013

Old Wooden Chest

This is one of my favorite pieces of all time!  
I refinished it for the boutique and I just realized it doesn't have it's own post.  
It defiantly deserves it's own post!  

This little guy needed some love.  But it wasn't anything a little time and Bondo couldn't fix!


I wanted to add some more personality to this chest! 
 I pulled out my stencils and I loved this design, it seemed very fitting for this piece. 
A little tip when doing stenciling consider where you will start and end your stencil.  Drawers are great because they already have straight lines and start and finish points are easy!  

Once my stencil was on and dry I sanded it all down and then added a glaze.  


I love the end result, I wish I had a little corner in my house for it.  But I think it has an even better home at my neighbors!!

Happy Friday EVERYONE!!!

TTFN
Brooke

Linking here:

http://modvintagelife.blogspot.com

Thursday, May 23, 2013

Make Your Own Family Photo Wall


Just incase you missed it here is the post I shared at Take It From Me Yesterday..........


I don't know about you but I am obsessed with taking pictures of my children, naturally I have A LOT of pictures.
 I wanted a fun way to display their pictures and showed off all those fun moments!  

What better than a Family photo wall!  

What!? You want one too?  You have come to the right place!  I will walk you through how my photo walls have come to be!


When creating a photo wall don't be afraid to add elements other than picture frames.  If you have a favorite family saying try incorporating it as I have with our family wall.  You can find sign tutorials on my blog here


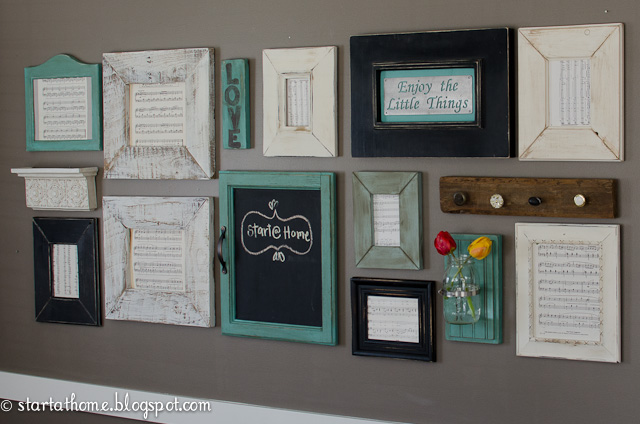
I made this wall for a boutique I recently had in my home, I wanted to add fun elements to bring character to the wall.   Old vintage knobs, fresh flowers in a mason jar vase, a fun shelf and a chalkboard all break it up a little and add a fun flair to the wall.


The 2 photo walls above are very large and take up my entire wall.  Which are great for that big wall you don't know what to do with.

Don't have a space that big?  No problem.    

This photo wall is only 36inches by 42inches.  It is in my VERY small half bath.


You may have noticed in all 3 of my walls none of my frames match!  
Some of them I have made, others I have found/collect, and some were even in an old forgotten box downstairs.  

I know those wheels are turning!  

Lets get to work making your own photo wall!


First things first decided how big of an area you have.  Big or small and tape out where you want your pictures to be on your wall.


Next I like to tape the same dimensions out on the floor and rearrange my picture frames until I like how they are positioned.  This saves lots of nail holes in the wall.


Once I have found that perfect arrangement I decided what colors I want them to be.  I liked all of the frames current colors except for the large oval one, she got a coat of paint!  I than add what I want in my frames.  For this project I found cute old sheet music at a thrift store.


Next position your frames one by one.  In your taped out area on your wall!


Pull off the tape ......... 


and TADA you have a new photo wall! 

Don't be afraid to be creative, after all it is your WALL!!!

Thank you again to Take It From Me for letting me take over your blog for the day!!

TTFN

Brooke


Wednesday, May 22, 2013

Guest Blogging and a DIY photo wall!

Today I am honored to be taking over Take It From Me's Blog!
Head to their blog to see how you can create your own photo wall!


Tuesday, May 21, 2013

Fresh Eggs & Sign Tutorial

Who else loves signs?  I think I need a sign for just about everything.  I am assuming you do too, so I thought I would share with you how I made these 2 signs in my kitchen.  The best part is ANYONE can do it and it is so easy!


What you need:
Wood
Graphite Transfer Paper
Letters (I printed mine from my computer)
Pencil
Paint Brush
Paint
Sand Paper
Dark Wax or something to antique with like a glaze


  1. Cut your wood down to size.  I used a 1x4 pine and cut it to be the length I wanted.
  2. Paint your piece of wood
  3. Print your words out.  Remember to scale your font to fit on the piece of wood.


4. Place your graphite transfer paper in between your letters and the piece of wood.


    5. Trace your letters, check to make sure your letters are being transferred.  It should look like this.


    6. Once you have traced your woods pull out the paint brush and fill in letters


   7. After your paint has dried sand your board down lightly as to give the distressed look.
   8. Now add your dark wax and TADA you have a new sign!

For the Grocery sign I added a turquoise boarder out of wood to add a little color!

Like I said before I love signs, here is another post with some other signs I have made!
Also there is more than one way to make a sign here is another sign tutorial I made!

I am so excited to be taking over Take It From Me tomorrow!  CHECK IT OUT!!!!!

TTFN

Brooke

Monday, May 20, 2013

Stuck in the Middle

I have been trying to think of something to blog about, but I seem to be stuck in the middle of so many projects.  Maybe that is my problem, I start too many things (note to self!!)

We are trying to finish up refinishing our basement and it may or may not be taking so long because I keep adding projects to the list.  Like putting bead board up on the ceiling!

You can imagine my husbands excitement when I added this to the list.  Good thing he is awesome and helped me do it anyway!

We are both so pleased with the progress.  I took lots of pics a long the way so there will be tutorials to come!


We also put bead board on the walls.  Bead board over kill?  I think not, I don't believe that is possible with bead board.


All of the holes have been filled and the cracks have been caulked so today is painting day, the real task is picking a color, I always get a little anxiety at this part!

Wish me LUCK

TTFN

Brooke  

Tuesday, May 14, 2013

Adding Color to the Kitchen!

Here is a quick refresher on what my kitchen used to look like.  Here is the full post on the renovation.


After: Although it is ever changing.  My husband says with me nothing is ever done. :)


For the more Permanent items like the granite and backsplash I went with a neutral pallets so as my taste changes I can simply change out my accessories!  And right now I am loving Turquoise and Lime Green!  My main color is turquoise but I wanted to break it up a bit with Lime Green here and there.  For my neutral colors I have used Browns and Grays as they are both in my granite and backsplash.


I wanted a BIG, BOLD statement on this wall.  You can see it from the front door and almost anywhere on the main floor.  I debated on several different ideas from a chalk board  to a whole bunch of signs but decided to go with EAT really really BIG!!!

I love the statement it makes.  I created the letters out of wood from old pallets and stained them to bring out the richness in the wood.  I used Early American Stain by Miniwax, so the letters would match my floor and help bring your eye up!


 I made my own signs (tutorial to come)  I wanted them to be simple, yet bring color and personality! 


 And of course every kitchen needs a little BLING!!! 


TTFN

Brooke

Linking here
http://linda-coastalcharm.blogspot.com

Monday, May 13, 2013

Chalkboard Desk FOR SALE!!!

I have always loved Chalkboards of any kind!  Why not put one on top of a desk?  This is perfect for doing homework, leaving messages, and really helps save on paper. The chalkboard top is very durable and can wipe completely clean with a very damp cloth.  

This desk has a beautiful front panel too, so if you wanted to float it in the middle of a room you can!


Great under desk shelf for hidden storage.
And the drawers and guides are in perfect shape.


The stripes are on all 3 sides.


This desk is 2 feet x 4 feet
$175

Please call or email me with any questions!
801-628-4249
brooke.n.larsen@gmail.com


LinkWithin

Related Posts Plugin for WordPress, Blogger...