Wednesday, December 31, 2014

My First Attempt at Upholstery...

I have been wanting to tackle an upholstery project for quite some time now.  I have a couch in my garage needing to be reupholster, however it is going to be a really big project so I decided to start with something a little smaller....like a slipcover.  I have been sewing clothes and quilts for years now but upholstery was a whole new experience. 

 I didn't work from a pattern for this chair, I pieced it together on the chair.  That being said I made my fair share of mistakes, I unpicked A LOT, but I wanted the slipcover to fit this chair tight.

Completing this slipcover took sometime, I would work on it for a bit, get frustrated, and leave it until I could figure out a better way to do it.  I am happy to say Finally it is DONE!!  There are a few mistakes and tucks, but for my first go we will call it a success!


I used an drop cloth for the fabric, which I pre washed in hopes to avoid any shrinking when washed. With 3 kiddos I am sure It will have to be washed at some point!


I need to make another slipcover for an identical chair, I hope it goes a bit smoother now that I have an idea of what I am doing.  I will try to take some more pictures along the way! 

I hope everyone has a Happy New Year!

TTFN

Brooke

Monday, December 29, 2014

Upgrading Those Builder Grade Closets

As you may know this summer we welcomed baby #3, creating quite the room shuffle. We only have 3 bedrooms upstairs and I wasn't too keen on the idea of sending my 6 year old to the basement so that meant room sharing....boo!!  

Our rooms upstairs are not large, in order to get 2 girls in the same room I built them bunkbeds (post here).  I have never really loved bunkbeds maybe because I had one all growing but my girls think they are the coolest things ever, which makes their mom (me) totally awesome for building them beds....RIGHT!!??  

With the bed problem solved now I needed to fix the storage problem.  Their room is only big enough for one dresser and so I decided to maximize the space in their closet.  My first thought was to rip everything out and start over new.  I think I just like to demolition things, my husband on the other hand did not like that idea, so we worked with what we already had, which I think was best!  It is a good thing I have him to keep me in check!

Here is the Before


Here is the new organized closet.  
I moved both of the rods to the same side allowing me to add 3 shelves.  
The wood for the shelving only cost me $20 and I found the shoe organized at Home Depot for $30.  I also added a few hooks for them to hang their purses and jackets on.


With 2 girls in the same room I knew it would be hard to keep things organized on open shelves, and with only 1 dresser I needed a few more spots to stash clothes.

The galvanized buckets I found at Ace Hardware and the canvas bags were purchased from Kohls.  They have worked great for organizing clothes and toys!


Now don't worry their closet doesn't always look like this, I actually cleaned it for these pictures.  However I have been very proud of them, I checked it today and it is still clean, I think this is a record!


 TTFN

Brooke


Saturday, December 27, 2014

Another Vanity....They Never Get Old!


A client of mine brought this chest to me to be refinished for his wife for Christmas.  I always get excited to refinish these old chests/vanities and with it being a surprise it was even better.
We decided to go with a classic look and leave as much original as possible. 
We left the original silver backed mirror.  Over the years the silver has oxidized leaving some spots here and there, as you can see in the picture.  The character of the mirror added perfectly to this piece.  


A few of the original glass knobs were still intact but they were all beat up.  I just so happen to have some old vintage knobs that matched perfectly to the original ones for the bottom 2 drawers.  I used a smaller glass knob for the top drawers.    


This chest was made with oak, I was so glad when they wanted to leave the top stained, stained oak is just beautiful. I used Dark Walnut stain by Minimax.  


For the reveal my client brought his wife to my house.  I always love to see peoples reactions and I am happy to say she LOVED it!!

TTFN

Brooke


Monday, December 15, 2014

Christmas Gifts

I always like to give my neighbors a little something every year for Christmas to let them know we care. This year I wanted something with a little bit of my personality in it.  As I am sure you can tell, I love all things vintage, but vintage candy probably wouldn't taste so great, that is if I could even find some ;)  I decided to go a different route.
My oldest daughter is turning 6 this week {eek} she is getting to be good little helper.  She  cut all the stripes of paper down to size!  I am really loving this Mother Daughter crafting time.  I sure hope it keeps up, a mini me in training....maybe?!?


These are bagged Hershey Nuggets I found at the local grocery store.  I then wrapped each piece of candy with vintage sheet music I picked up at the DI, a local thrift store.  Once they were all covered with sheet music I used cellophane to wrap them up.  I tied some twine around and attached these awesome tags I found at Shanty 2 Chic for the final touch!


I used a little bit larger hershey bar for these ones, I loved all the fun colored wrappers!
To dress them up a bit I went with gold glittered ribbon instead of twine.  I love how elegant they turned out!


These are the perfect little gift to let someone know you care about them.  
The best part is they came out to be about $1.50 each!

TTFN

Brooke

Saturday, December 13, 2014

A Coral Vanity


Man oh man just look at this chest, believe me when I say it had seen better days.  The top was not salvageable, the drawers were all broken, the mirror was non existent, and the caster wheels were broken as well.  You may say, Why oh why would you attempt something like this...my husband often says the same thing.  But there is just something about these chest that every time I can get my hands on one I take it!


And here she is all dolled up!
Now you see why I pick them up, they are so stunning finished!


This chest was pretty plain to begin with.  The perfect backdrop for a little creativity!

I ripped a baluster down the middle and placed one on each side, I also added the moldings in-between the drawers.  I painted the added molding with White Dove by Benjamin Moore to make them stand out! 

I had this mirror in the garage, and as luck would have it, the mirror fit perfectly on the chest.


As you can see from the before picture the top of this chest was in bad BAD shape.  I tried to pull the old veneer off but it wasn't salvageable.  On to plan B, replace the top completely.  

I stained the new pine top with Miniwaxes Dark Walnut to break up the coral a bit!

 And for the finishing touch I added these vintage knobs.


Wednesday, December 10, 2014

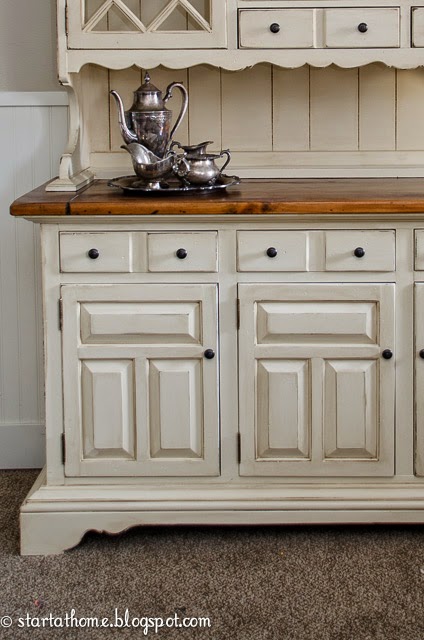
A Beautiful Hutch Makeover!


I am sure you have seen many of these hutches before, and your response maybe similar to mine....YUCK! After all they are a bit dated and dark. Well I have good news it is nothing a little paint can't fix.

This hutch was a custom refinish, and I have to admit my client picked great colors.  


I love the cream she chose, I don't have a name for this paint as I took one of my cabinet doors in to the paint store and had them match it.  


The wood top compliments the cream perfectly.  I used Miniwaxes Early American Stain, what a rich color this stain is on pine!


I spray painted the original hardware oil rubbed bronze for a new fresh look.  


I couldn't be happier with how this hutch came together, it will be beautiful in it's new home!

ttfn

Brooke

Follow me on Facebook
Follow me on Instagram

Linking here
Miss Mustard Seed
French Country Cottage

LinkWithin

Related Posts Plugin for WordPress, Blogger...