Monday, February 22, 2016

How To Hand Paint Furniture Like a Pro with Latex Paint


Here are the basics on how to hand paint your furniture like a pro.
I like to use latex paint, as it has held up the best against my kids over the last 4 years. I have experimented with many specialty paints (chalk paint and milk paint) and I do believe they have their place, I use them for accent pieces or various decor items.  But for me, if I am going to put in hours after hours to refinish a piece of furniture that gets lots of use I want it to last!

handpaintfurniture


Here is a list of items you will need to paint your furniture with links to Amazon.  These items can also be bought at Home Depot, Lowes, Ace Hardware or your local hardware store.
Supplies
  1. Sandpaper - I like to use100 grit to sand everything down in the beginning and 220 for in-between coats.
  2. Flotrol
  3. Latex Primer - I like to use Kiltz Latex primer or Zinsers Latex Primer.  They cover great and are cost effective.
  4. Latex Paint- I like to use Sherwin Williams, Ace's Valspar or Benjamin Moore
  5. Paint Brush-Selecting a brush is also very important.  I like to use Purdy or Zibra Brushes they have soft smooth bristles making for a smooth finish.
frenchtable-6-2
Prep Work:
Taking apart- First of all I take all the hardware off and the doors.  I like to disassemble all of my pieces as much as possible.  It allows me to keep the hardware clean and free of paint plus I  get a much better paint job.
Sanding- Now it is time to pull out your 100-grit sand paper.  You want to sand everything down, every last inch.  The finish doesn't have to be all the way off but it needs to be roughened up so  the paint will have something to stick and grab on to.  It is also a good time to make sure your surface is good and smooth.  If you surface isn't smooth it will show when it is painted.

Sanding


Painting:
Priming- getting a good even coat of primer everywhere is key to making sure your paint is going to stick.  Primer helps to seal your surface allowing for even painting.  Primer also helps  paint stick and bind to your piece of furniture.
Sanding in between coats- Once your primer is dry use 220 grit sandpaper to smooth out your paint.  This will also help to eliminate brush marks (I also lightly sand in-between each paint coat)
Painting- I like to add a little bit of Flotrol to my paint.  Flotrol helps to eliminate brush marks in your paint without deluting your paint color.  Start at the top and use long straight brush strokes whenever  possible.

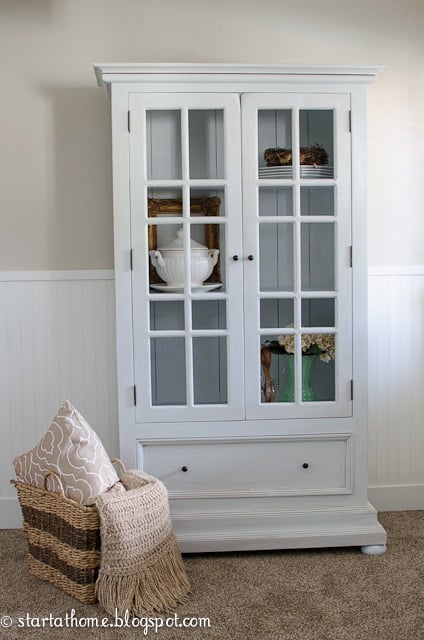
This hutch required 3 coats to cover.
BLUEhutch


Finish Work:

Antiquing- I always like to sand at least the edges of my piece.  Paint is hard, it will chip.  However eliminating paint from the places it is most likely to chip from will help your paint stay looking  nice even longer.  If you like your pieces more distressed you can sand it more in certain areas.  I like to sand in areas that I think the paint will naturally flake off at for a more natural look.

Yellow Bench-3


BLUEhutch-4


Glazing-After your paint has dried/cured for 24 hours.  It will be ready to glaze.  There are many different ways to glaze.  I wanted a heavy glaze on this hutch so I used stain.  Stain can be tricky  to glaze with so make sure and follow my "glazing with a stain" tutorial here.

Hutch-4

Top Coat-A top coat is one of the most IMPORTANT steps of this process.  A top coat is what will seal and protect your piece you have worked so hard on.  I personally like to use Varathane Water-Based Diamond Polyurethane Finish in a spray can.  It eliminates brush marks and goes on nice and  even!

After you have top coated your piece let is sit for at least 24 hours before you start using it.  This will give your paint and top coat time to set up.  Keep in mind, latex paint can take up to 30 days to fully cure and harden, but it is okay to use it before then.
I hope this guide has helped you to refinish your furniture like a pro!!
TTFN
Brooke

Tuesday, February 16, 2016

Shop the House Challenge #2

If you remember from last month I am part of the Shop Your House Challenge.  For 4 months we will shop our houses to redo one room.  I have loved this challenge.  If you are like me whenever I think "I need to redo this"  the next thought is "what store should I head to."  Well I am happy to say, I shopped my house and I am happy with the outcome!


My family room needs a lot of work so I decided to tackle the seating corner first!  This is one of our favorite corners in our home.  You will often find one of us sitting there reading or relaxing.  

My family room is right off of our kitchen so I wanted to bring the teal accents in to make these spaces come together better.  


I went to an upholstery class awhile back and made this beautiful ottoman.  It has just been floating around our home looking for a spot....well I am happy to say it is here to stay! 


If I am ever at an estate sale and find something for a good deal that I love I will usually buy it even if I don't know what I will do with it...and that is the case with this beautiful wash bin.  I loved the texture and it was only $5 so I couldn't pass it up!  

The polk a dot pillow I found with my mom at a market last year.  It has been in my closet waiting for the perfect spot too!

Are you seeing the trend here.  Although keep in mind I do sell things at vintage markets a few times a year so if I don't find a spot for something it will usually end up at one of my markets!


Need some more inspiration for shopping your house?  I have teamed up with these other talented ladies as well!  Head over to their blogs to see how they shopped their house!

Courtney from The Hamby Home
Allison from A House and A Dog
Kendra from Momtique
Annie from Zevy Joy
Iris from Iris Nacole

TTFN

Brooke

 photo instagram_zps88445fe4.png  photo fb_zps5d3a02b1.png  photo twitter_zpsb5c638e9.png  photo pinterest_zps0cdb4597.png


Friday, February 12, 2016

Farmers Market Sign

I am so excited to introduce my first custom Farmers market sign!  
I wanted to create a sign with options and here she is!  
Option 1 This sign comes complete and ready for your to use in your home as soon as it arrives.  However if you are like me you probably prefer to make your own sign just the way you want it.


So here is Option 2.....you can buy just the pre finished wording.  
This sign will come raw and ready for you to decorate however you want.  You can paint, glitter, deco podge, or antique just to your likings!  


The lettering is cut out of 1/4 inch thick MDF making it light weight and easy to hang on the wall or sit on a shelf.

For the sign I added the lettering to 1" thick pine which I stained, and I added a cream wood frame around the outside edges to match the lettering as well as to create a finished look!  


You can purchase the Farmers market here
and the full sign here

TTFN

Brooke

You can follow me here:
 photo instagram_zps88445fe4.png  photo fb_zps5d3a02b1.png  photo twitter_zpsb5c638e9.png  photo pinterest_zps0cdb4597.png


Tuesday, February 9, 2016

How To Add Color to Your Hutch

Colors and style change fast these days.  But I admit I love color, so I really wanted to find a way to add color to my hutch without painting the whole thing a trendy color.  I am not opposed to trendy colors, in fact I kind of like them.  But when it takes hours/days to paint something it doesn't make much sense to paint it a color I am going to hate in a few years.

For this hutch I stuck with a nice soft cream latex for the body of the hutch.  
I added my color by removing the old back panel and replacing it with a new one. 


Here is how I did it:
First I popped the old back out.  I was careful to not destroy the old back so I could use is as a pattern for the new back.   
Next I cut my bead board down to size-You can buy 8'x4' sheets of bead board at Home Depot for around $20
After the bead board was cut down to size I painted the entire back with Annie Sloan's Chalk Paint in Duck Egg.  It took me 2 coats of paint.
Once the paint dried I used my staple gun to attach my new back in place.  


Now my white dishes have an awesome backdrop that really makes them pop!

And the best part?  When I am sick of this color I can easily pop that back out and repaint it!


TTFN

Brooke

You can follow me here:
 photo instagram_zps88445fe4.png  photo fb_zps5d3a02b1.png  photo twitter_zpsb5c638e9.png  photo pinterest_zps0cdb4597.png


Monday, February 1, 2016

DIY Welcome Door Hanger

I have been wanting a welcome sign on my front door but I didn't want it to cover my window all the way. 


Perfect solution.  I can still see out my window and I have a welcome sign!


This welcome sign was super easy to make.
You will need:
A frame, I found mine at a thrift store and I believe it was only $2
Spray paint
Burlap and Lace
Hot glue gun


Once you have all your supplies I used spray paint to spray my welcome sign.  I have found spray paint is the easiest to paint these word cutouts, as it gets in all the tight corners easiest.  

After my spray paint dried I sanded my edges slightly.  
Next you need to tie your bow.  
I used 4 1/2 inch thick burlap that was 3 feet long


I first folded my burlap like this


And then I squished both sides of the center together to create my bow


To hold my bow in place I used a 2 inch thick piece of burlap in the center and hot glued it down in the back.  


If you want to add lace like I did you would put it under the center piece of burlap before hot gluing it to the back.  


Once my bow was made I laid everything out on my frame and once I had it where I liked it I hot glued it down.  
Creating this super easy welcome sign!  


LinkWithin

Related Posts Plugin for WordPress, Blogger...